

Measuring Baseline Latency Metrics for Legacy Systems
- Guruprasad Rao
What is a legacy system?
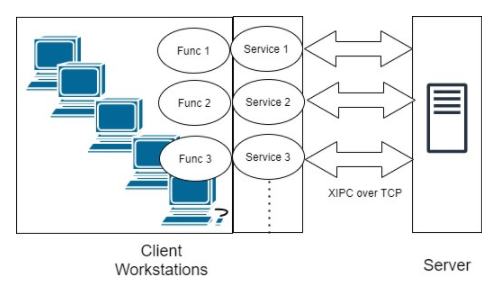
Various types of legacy systems are built, from IBM Cobol, Turbo Pascal, to Borland Delphi. In the context of this blog, a legacy system is referred to as a system that was implemented in an earlier version of Delphi and prior to 2000. The diagram given below depicts the high-level architecture of the legacy system that will be considered as a legacy system for this blog.
Challenges with the legacy system
The biggest challenge of legacy systems is that there is no effective way to capture baseline performance latency metrics using currently available tools. If we can’t capture baseline latency metrics effectively, how do we check the current performance of your system? Why can’t we measure the baseline performance latency metrics? What is the root cause of not being able to measure it effectively?
Root cause
The performance of any modern application is measured using performance tools. Most available tools in the market use the L7 layer (HTTP/HTTPS/FTP/SMTP) based protocol to capture the latency. In contrast, legacy systems built with old technology programs use proprietary XML over IPC (XIPC) using OSI L4 protocol. The tools developed post-2000 have been matured to work with SOAP and REST on the L7 layer with little or no support for XIPC over the L4 OSI layer.
This leaves us with two options for solving the problem:
- Option 1:
Reengineering legacy systems to support SOAP and REST implementation. Reengineering the legacy systems may not be the optimum solution given the risks and concerns involved. With strong migration methodologies and reengineering techniques, migration may still be possible. But it involves time, and maintaining and testing them during these situations is tricky for business continuity and availability of skills in the market.
- Option 2:
Analyzing and conceptualizing problems differently and understanding your current legacy system in relation to the support available in the open-source community. Excluding use cases that require custom solutions. Identifying timelines and prioritizing use cases based on business needs that can be realized using open source. Finally taking the combination route of open source and custom implementation as an overall solution depending upon your legacy system complexity.
Feasible solutions
The section below identifies three feasible solutions in measuring network latency through load testing. You can choose the right one depending upon the interoperability maturity of your legacy system.
- Solution 1: XML payload over TCP (L4)
In this method, TCP Clients send a proprietary XML payload to the server service and receive its responses. Distributed JMeter setup helps generate the desired number of threads (users) to perform the Load Test. All the slaves acting as load generators must be in the same network so that there is no discrepancy in the network latency, which impacts the result.
- Solution 2: Binary payload over TCP (L4)
This solution uses binary data as part of the payload. This option is chosen when you have a lack of understanding of your system and, as a result, cannot define XML payload. Tools like Wireshark can be used to extract the data. The way of applying load is similar to solution 1.
- Solution 3: Build your own load testing tool over the L4 layer
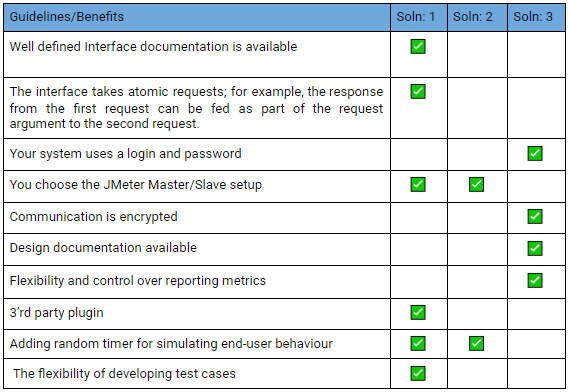
You use this solution when you are not able to use any of the open-source or commercial tools available to apply load due to technical challenges. In this solution, you build a wrapper (client application) on top of the L4 layer interface and launch multiple client application instances to perform load testing. The table below identifies guidelines on which solution to be considered for your legacy system and what benefit you gain from it.
ATMECS solution
Within ATMECS, we chose a mix of option 1 and option 3. Option 1 is using JMeter Master/slave setup modified to work with Winapp drivers.
Use case: Winapp driver with JMeter/Selenium grid for Windows Desktop client-server legacy application :
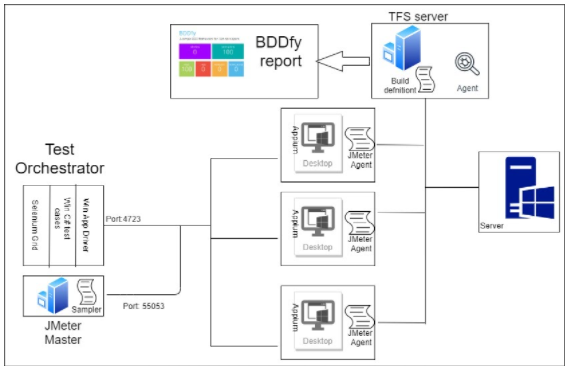
The ecosystem depicted below brings together various open-source tools available in the market of solving the challenge associated with capturing performance latency at the scale of a legacy application.
This section will describe the purpose of using the following tools as part of the ecosystem:
- Selenium
- Grid/Appium web driver
- JMeter Master/Slave
Microsoft Windows application - (WinApp) Driver
- TFS Build server
- Selenium Grid/Appium Web driver
It is used to scale by distributing and running tests on several machines to synchronize and manage multiple functionalities from the central point, making it easy to run tests against a vast combination of functional test cases. For example, managing emergency services in a control room requires synchronizing call taker functionality from the public with call dispatcher functionality to dispatch the police force to the incident location. The solution requires either Selenium grid or JMeter Master/slave. This article explains the setup using JMeter Master/slave setup; however, the same can be achieved using the Selenium Grid/Appium web driver combination.
- JMeter Master/Slave
All the machines (master and slaves) are in the same (local) network. Among them, one machine is treated as a master, which controls the other slave machines during test execution. The slave machines follow the instructions initiated by the master machine.
- WinApp Driver
WinAppDriver is a test framework developed by Microsoft as an open-source project; it’s an implementation of Appium, which is primarily a Mobile App framework, itself based on Selenium. Therefore WinAppDriver is a Selenium-like automation framework. This solution leverages the WinApp driver as part of functional testing for desktop legacy applications.
- TFS server/Azure DevOps server
Used to set up a pipeline is a preconfigured set of steps that determine the build and deployment process every time there is an update on your code. The server hosts a build definition for the automated process and can save time on continuous integration.
- BDDfy Report
By default, BDDfy also generates an HTML report called ‘BDDfy.Html’ in your project’s output folder: HTML test report shows the summary on the test results scenario along with the step result (and in case of an exception, the stack trace). You have a lot of control over HTML reports and can customize a lot of things. You can also inject your own custom CSS and Javascript to get full control over the styling too.
Environment setup:
Step 1: WinApp Drivers changes:
Jmeter Junit request sampler will use the jar file which contains Junit test methods to send requests to slave machines. To develop the script Junit framework for WinApp drivers do the following:
Install & Run WinAppDriver
1) Download Windows Application Driver installer from https://github.com/Microsoft/WinAppDriver/releases
2) Run the installer on a Windows 10 machine where your application under test is installed and will be tested
3) Enable Developer Mode in Windows settings
4) Run WinAppDriver.exe from the installation directory (E.g. C:\Program Files (x86)\Windows Application Driver)
Step 2: JMeter setup:
Setup the JMeter Distributed testing environment on Master and slave machines.
Reference link: https://www.guru99.com/jmeter-distributed-testing.html
Step 3: Automation Script setup:
Install any IDE(Eg: Eclipse) and use JUnit as the testing framework and required dependencies.
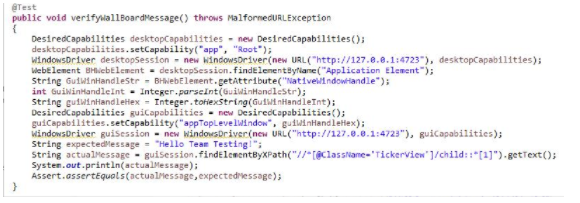
Identify Windows app Application root page object and replace it with ‘Application Element’ and create a session using WindowsDriver.Below is the sample code snippet.
Once the test case writing is completed, create a jar file.
Step 4: Run from Jmeter Grid :
Place the created test jar file in the given path ‘C:\apache-jmeter-5.1.1\apache-jmeter-5.1.1\lib\junit’ on Master and slave machines.
Similarly, all test jar file related dependencies should be placed in the given path C:\apache-jmeter-5.1.1\apache-jmeter-5.1.1\lib
Now take a new Test plan from Jmeter Console installed on Master > Create new thread group > Choose Junit Request sampler > Choose the required package and test methods in Junit request sampler and select JUnit 4 annotations check box.
Add view results tree listener to capture test results.
Now run the test plan from Jmeter Console.
JMeter report:
Once the above environment setup is completed, Jmeter measures the elapsed time from just before sending the request to right after the last response has been received. JMeter includes the time elapsed between client and server for a TCP session.
It can generate the report at the end of a load test or on-demand. A request summary graph shows the succeeded and failed requests.